Thursday, August 30, 2012

Laundry Insurance

The first time I had to wash my daughter's cheerleading uniform, I put it off for WEEKS!  I'm not proud that I ignored that $300 pile of fabric for so long.  It's red and white--every mother's laundry nightmare!  It wasn't stinky or stained, but she had worn it for her cheer camp performance and the first day of school was fast approaching so I HAD to wash it.  Oh the horror!!  I took a deep breath and tried to figure out what kind of soap, what temperature, which cycle and water level would keep the red dye off of the white.

A walk through the laundry aisle at my grocery store didn't help too much...until I found this:


Shout Color Catcher!  I used to use these years ago, but my grocery store stopped carrying them.  (I now shop at a much better store -- more on that later!)  These things are AMAZING!  Just throw one sheet in with your clothes and laundry soap at the beginning of the wash and the sheet absorbs the dyes from the wash water that would normally redeposit on other clothes.  No more full loads of white clothes turned pale pink by one red sock.  No more need to sort your clothes by color.  No more wasting water with half-full loads because you can wash it all together now!   *cue the chorus of angels singing!*

I may be weird, but my favorite part is that you can actually SEE the extra dye on the sheet at the end of the wash.  There's something oddly satisfying about finding that pink (grey? orange? green?) sheet mixed in with the clean clothes.  It's tangible evidence of the fact that I just saved the whole load of laundry from certain death.  OK, perhaps that was a tad dramatic.

When I finally washed her cheer uniform, the Color Catcher was BRIGHT pink from the extra red dyes that ran into the wash water.  Wow!  I'm so glad I found these again.  I use them with every load now and I don't even sort my clothes by color.  My Laundry Day just turned into my Laundry Half-Day!  I think of them as my Laundry Insurance!

**I'm not affiliated with Shout in any way.  This is just my opinion.**

Wednesday, August 8, 2012

How to Bling

Blinging, Bedazling, Bejewling.  All these terms refer to the act of gluing sparkling crystals onto clothing or crafts...or if you're a cheer mom, gluing crystals onto EVERYTHING!  I am a Southern Cheer Mom; the worst offender out there!  (and I call it blinging)

There are two ways to bling:

*  One way uses a hot tool to heat the crystal and activate glue that has been pre-applied to the crystal.  This is the best way to apply crystals on tshirts that don't have any screen printing on them (the hot tool will melt the screen print).  To use this method, you need to purchase crystals labeled "Hot Set".  These crystals usually have a dull grey backing; this is the glue that will be activated when heated.  Here's a pic of my hot tool:
The little bag in the left of this pic is a bag of tips that came with my tool.  They vary in size, but I find that I get more use out of the small, flat tip that's on the tool in this pic.  (see how "loved" it is compared to the bright shiny ones in the package?)

The bag on the right is a bag of red hot-set crystals.

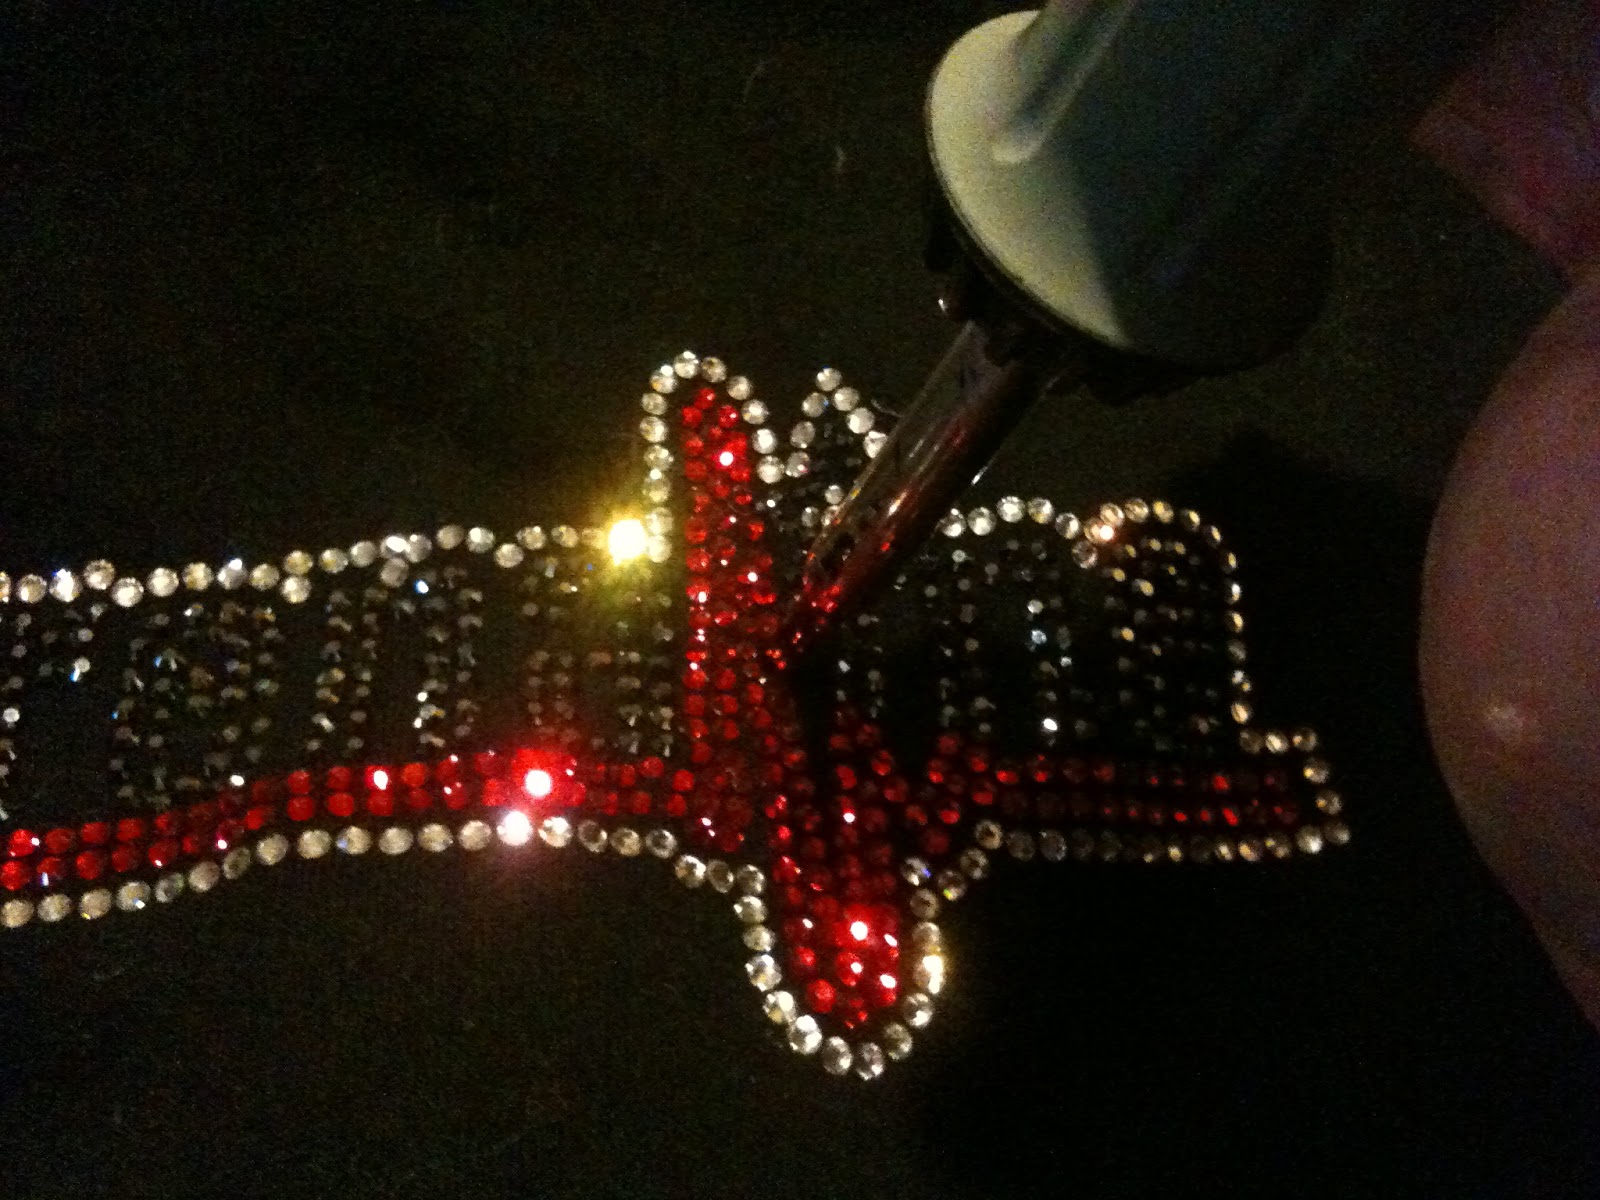
To demonstrate this method, I'll show you how I replaced a missing crystal on a jacket:
 Place a hot-set crystal on your project:
 Hold the heated hot tool on top of the crystal.  Hold for 8-10 seconds to fully activate the glue.
 Let the glue cool completely...and you're done!

While the glue is still hot, you can use tweezers to gently move the crystal into position if needed.

* The second way to add bling to your creations is to use glue.  The best glue I've found for gluing crystals on is E-6000 glue.  BE CAREFUL when using this glue!  It's super stinky!  Please use in a well-ventilated room and follow the precautions on the package.

In this picture, you see red, black, and white crystals on the left and E-6000 glue on the upper left.  Also in this photo is a wax stick (a stick with sticky wax on one end) and tweezers.
 To glue your crystals on, simply place a dot of glue on your project and place the crystal on top of the glue.  Ideally, you want the glue to cover the entire back of the crystal and come out of the sides of the crystal JUST ENOUGH to hold the crystal in place (like a diamond is held in place by the prongs on a ring).

 In the following photo, I'm using the tip of the glue tube to spread a small line of glue over an embroidered "e" in the name, "Courtney."  The embroidery serves as a guide for the bling in this example.

 Then, I use the wax stick to pick up a crystal (I empty my crystals onto a plate so they don't scatter too much)...
 ...and place the crystal into the glue.
 I continue placing crystals until the "e" is filled.  While the glue is wet, the crystals can be moved around to ensure complete coverage.
 The finished name:

Wait for the glue to dry (up to 4 hours) and you're done!

Whether you choose to glue or use a hot tool, some of your crystals may fall off so keep your extras handy!

Now, go out and find something to bling and tell me all about it! :)


Linking with:


How I Turn One Pound of Hamburger Into Dinner for Six--WITHOUT any "Helper"

Don't get me wrong--"Helper" is a fabulous time-saving invention!  I have been known to use a "Helping Hand" more than I care to admit.  One night, however, I found myself in the middle of a cold-weather induced blackout with only one pound of hamburger to feed six hungry family members.  No lights.  No microwave (gasp!).  One Pound.  I had to think FAST and this is what I came up with.  It has been known in our house ever since as, "Hamburger Stuff."

Ingredients:

1 lb. Hamburger Meat
2 boxes Fast-Cook Rice Mix (I use Uncle Ben's Original flavor)
1 can Cream of Mushroom Soup
2 1/2 Cups frozen mixed veggies

Brown the hamburger meat and drain off excess fat.  Add two boxes of rice mix and the water called for on the rice box.  Follow the directions on your box of rice to cook (mine says to bring to a boil, then cook for 5 minutes).  When the rice is done, add the soup and veggies.  Cook until the veggies are warm.

It's THAT easy!  I usually serve this with biscuits (homemade or canned) and a green salad.

I hope you like this as much as my family does!

What's your family's favorite easy go-to meal?

Linkng with:

A bowl full of lemons


The Easiest Way to Shop for Groceries


Ok, I admit it.  I'm a coupon fanatic.  I love to use coupons for groceries, beauty products, restaurants, etc.  The problem is, sometimes there's just not enough time to make a grocery list, compare it to the sales at our various grocers and match up my coupons!  It's time consuming, but saves SO MUCH MONEY! 

So how's a Modern Homemaker to save money and time on those weeks that there's not enough of either??  MAKE A LIST.  ...and buy ONLY what's on that list. 

Sounds simple, right?  It is!  ...But there's a twist!  Here's the way it works:

1.  Make a list of the meals you want to make for the week (or two weeks - what ever your schedule or budget allows)
2.  Find (or write) the recipes for each meal
3.  Based on the recipes, make a list of the items needed for each recipe (even the ones you already have on hand).  Separate this list into sections, like your grocery store is separated; produce, meats, cold meats/cheeses, dairy, etc.

I can hear you say, "So far, this isn't anything new, MH!"  Stay with me!  This is where the genius part comes in!

4.  SAVE THIS LIST!  Staple it together (list and recipes).  Laminate all the pages, punch holes in the sides and tie it together with pretty ribbon.  Make a cover sheet.  What ever makes sense to you--just SAVE IT!

Pretty genius.

Now, the next time you don't have enough time to plan a whole week's worth of meals and shopping list for those meals, you can grab this list.  Running late and need someone to start dinner for you?  No problem.  The recipes are all written out!

The next time you have LOTS of time (stop laughing), you can make another one or two of these lists to have on hand.

I have been doing this for a couple of years now and I have amassed about a dozen of these Easy Lists.  When I share this idea with my friends, they usually ask to see one of them so I'll share one of my favorites with you.


Click here:  https://docs.google.com/open?id=0B95JjkhHSMmaZDNkZjg0ODUtYTZmYy00ZDgwLWI2MWUtMTU0MzljMTNhZTBh

Some of my favorite websites will make a grocery list for you, based on the recipes you select.  Here's a few to try:

http://www.kraftrecipes.com/
http://www.pillsbury.com/
http://www.campbellskitchen.com/

To access this list function, you'll have to register on these sites.  Believe me, it's totally worth it!  I get emails from these sites with new, delicious recipes each week.

Do you have a way to save time and money at the grocery store?  Share it below! 

-MH

Freezer Stocking Party, Part 2


WE DID IT!  It only took 4 hours on "Packaging Day" (that's what I'm calling it when we get together to assemble all of our meals and package them for the freezer--hokey, I know, but it makes sense to me!).  Here's some pics of our meals (please forgive the photos; I'm new to photography, but I'll get better!)


22 Freezer Meals for our two families.

Our "leftovers" (SCORE!)  2 lbs of raw ground beef, 1 lb of cooked ground beef, 2 cups of cooked, shredded chicken, 2 cups of Parmesan Chicken coating, and 2 gallons of chicken stock from boiling all of our chickens (shown in the photo above, of the table).  All of this was divided between the two of us (I took the raw ground beef and the Parmesan coating, my friend took the rest.  I made a meatloaf with the ground beef and put the coating into the freezer so I'd have it on hand for my next Party)

 Over the past two weeks, my friend and I have been checking in with each other to see what the other is making for dinner, and to see which meals each other's family likes.  I'm happy to say that all of our recipes were a hit!  The Spinach Cheese Burgers and Garlic Ranch Chicken were definitely favorites, though. 

We're planning to do this each month.  Are you planning a Freezer Stocking Party?  Let me know how it turns out!

Tuesday, August 7, 2012

Freezer Stocking Party


Some of my New Year's Resolutions included (1) Spend more time with my friends, (2) serve a home-cooked meal more than 4 times a week, and (3) save money.  I combined all of these together and came up with a "Freezer Stocking Party!"

Here's how it works:
1.  Get a group of busy moms together that want to seve good meals, but don't always have the time to do so
2.  Come up with a menu (search the internet!)
3.  (Day 1)Shop for all the ingredients to make your menu
4.  (Day 1)Divide the tasks among the group (one person cooks all the meats, one person chopps all the veggies, one person boils all the noodles, rice, etc...)
5.  (Day 2)Meet to assemble the meals
6.  Enjoy on a hectic night (when you would have normaly gotten take-out!)

That's the basics...let's see if it works as well as I hope!

I tried to get a bunch of my friends together to do this, but because I came up with this idea on Wednesday and wanted to do it on Saturday and Sunday, only one of my busy friends was available for my experiment; Lizzie.  No problem! 

Lizzie and I came up with a menu:
Garlic Ranch Chicken
Parmesan Chicken
Southwest Chicken Wraps
King Ranch Chicken (one of my family's ABSOLUTE favorites!)
Pineapple Chicken (for the crock pot)
Taco Soup
Cheesy Spinach Burgers
Pizza Calzones

We both decided how many of each recipe we'd like to make and made our shopping lists.

We met at a wholesale club to purchase the meats and cheese.  I purchased all of the whole chickens, chicken breasts, ground beef and cheeses for $87.96!  Ok, I'll admit--I did add a box of huge pretzels to that shopping trip.  They're my FAVE!  :)

Next, we went to the grocery store to purchase all the other items (Gallon-size freeze zip-top bags are a MUST!)  I spent only $48.07.  Unfortunately, my shopping trips did not include anything that I had a coupon for.  Next time I think I'll plan my menu around meat sales and coupons to save even more cash.

Loaded down with our purchases, we met at my house to divide the work.  I'll cook the chicken (we had LOTS!) and she'll cook the ground beef and veggies.

Today, we meet to assemble the meals.  Wish us luck!